
Table of Contents – MariaDB replication
MariaDB replication in this step-by-step guide covers a Primary–Replica setup across popular Linux distros. You will install MariaDB, seed the initial data, start the services, and verify replication health with copy‑paste ready commands.
MariaDB replication Overview
This guide sets up MariaDB primary/replica replication. We’ll install MariaDB on two nodes, enable binary logs on the primary, seed the replica from a consistent dump, and start replication. All steps are copy‑paste ready and multi‑distro.
Prerequisites for MariaDB replication
- Two Linux servers: DB1 (primary) and DB2 (replica) with sudo.
- Ports: 3306/TCP open from DB2→DB1 (and from app to DB1/DB2 if needed).
- Placeholders: DB1_IP, DB2_IP, REPL_USER, REPL_PASS.
- Distros: Ubuntu/Debian, RHEL‑Family (RHEL/Rocky/CentOS Stream/Fedora), Arch/Manjaro, openSUSE/SLE.
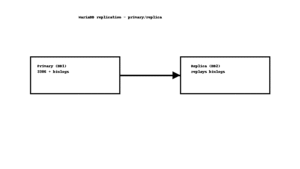
Quick Architecture
Apps -> DB VIP/Primary (3306) -> Binary Logs
                         |
                         v
                      Replica (replays binlogs)
Install / Setup for MariaDB replication
1) Install MariaDB server on both DB1 and DB2.
Ubuntu/Debian
sudo apt update
sudo apt install -y mariadb-server
sudo systemctl enable --now mariadb
RHEL-Family (RHEL/Rocky/CentOS Stream/Fedora)
sudo dnf -y install mariadb-server
sudo systemctl enable --now mariadb
Arch / Manjaro
sudo pacman -Sy --noconfirm mariadb
sudo mariadb-install-db --user=mysql --basedir=/usr --datadir=/var/lib/mysql
sudo systemctl enable --now mariadb
openSUSE / SLE
sudo zypper refresh
sudo zypper install -y mariadb mariadb-client
sudo systemctl enable --now mariadb
2) Secure basics on both nodes (optional but recommended).
sudo mysql -e "ALTER USER 'root'@'localhost' IDENTIFIED BY 'strong-root-pass';" || trueBase Configuration for MariaDB replication
3) Configure primary (DB1) for replication: enable binlogs and a unique server-id.
# Primary config (DB1)
# Ubuntu/Debian: /etc/mysql/mariadb.conf.d/60-replication.cnf
# RHEL/Arch/openSUSE: /etc/my.cnf.d/replication.cnf
sudo tee /etc/mysql/mariadb.conf.d/60-replication.cnf > /dev/null <<'CNF' || sudo tee /etc/my.cnf.d/replication.cnf > /dev/null <<'CNF'
[mysqld]
server-id=1
log_bin=mariadb-bin
binlog_format=ROW
bind-address=0.0.0.0
CNF
sudo systemctl restart mariadb
4) Create a replication user on DB1 that DB2 can use. Replace passwords and IPs before running.
mysql -uroot -p -e "CREATE USER 'REPL_USER'@'DB2_IP' IDENTIFIED BY 'REPL_PASS'; GRANT REPLICATION SLAVE ON *.* TO 'REPL_USER'@'DB2_IP'; FLUSH PRIVILEGES;"5) Take a consistent dump from DB1 and capture the current binlog position.
# On DB1
mysql -uroot -p -e "FLUSH TABLES WITH READ LOCK; SHOW MASTER STATUS\G" | tee /root/master-status.txt
mysqldump -uroot -p --all-databases --single-transaction --routines --events --flush-logs | gzip > /root/seed.sql.gz
mysql -uroot -p -e "UNLOCK TABLES;"
scp /root/seed.sql.gz root@DB2_IP:/root/
6) Configure replica (DB2): unique server-id, relay log, and read-only.
# Replica config (DB2)
# Ubuntu/Debian: /etc/mysql/mariadb.conf.d/60-replication.cnf
# RHEL/Arch/openSUSE: /etc/my.cnf.d/replication.cnf
sudo tee /etc/mysql/mariadb.conf.d/60-replication.cnf > /dev/null <<'CNF' || \
sudo tee /etc/my.cnf.d/replication.cnf > /dev/null <<'CNF'
[mysqld]
server-id=2
relay_log=relay-bin
read_only=ON
CNF
sudo systemctl restart mariadb
7) Seed DB2 from the dump and start replication. You need the LOG_FILE and LOG_POS from `/root/master-status.txt`.
# On DB2
gunzip -c /root/seed.sql.gz | mysql -uroot -p
mysql -uroot -p -e "STOP SLAVE; RESET SLAVE ALL; CHANGE MASTER TO MASTER_HOST='DB1_IP', MASTER_USER='REPL_USER', MASTER_PASSWORD='REPL_PASS', MASTER_LOG_FILE='mariadb-bin.000001', MASTER_LOG_POS=4; START SLAVE;"
Reload/Enable & Health Checks for MariaDB replication
8) Health checks: verify replica IO/SQL threads and lag.
# On DB2
mysql -uroot -p -e "SHOW SLAVE STATUS\G" | egrep -i "Slave_IO_Running|Slave_SQL_Running|Seconds_Behind_Master|Last_Errno|Last_Error"
# Or new syntax:
# mysql -uroot -p -e "SHOW REPLICA STATUS\G"
Security / Hardening
9) Restrict network access and limit replication user scope.
sudo ufw allow from DB2_IP to any port 3306 proto tcp 2>/dev/null || true
sudo ufw allow 3306/tcp 2>/dev/null || true
sudo ufw enable 2>/dev/null || true
Performance & Optimization
- Use ROW binlog_format for correctness (already set).
- Keep replica read_only=ON; consider log_bin=0 on replica if not cascading.
- Tune innodb_buffer_pool_size to ~50–70% of RAM for dedicated DB servers.
Backup & Restore
10) Backups: logical dumps are simple; for large datasets consider mariabackup.
mysqldump -uroot -p --all-databases --routines --events | gzip > /root/full-backup-$(date +%F).sql.gz
# Restore:
# gunzip -c /root/full-backup-YYYY-MM-DD.sql.gz | mysql -uroot -p
Troubleshooting (Top issues)
1) Access denied for replication user — wrong password or host not allowed.
mysql -uroot -p -e "SELECT user,host FROM mysql.user;" | grep REPL_USER || true2) Duplicate server-id — replication won’t start.
grep -n 'server-id' /etc/mysql/mariadb.conf.d/* /etc/my.cnf.d/* 2>/dev/null3) Replica out-of-sync — re-seed from fresh dump.
STOP SLAVE; RESET SLAVE ALL; # then repeat dump/import steps4) Firewall blocks 3306 — cannot connect DB2→DB1.
ss -lntp | grep :3306 || sudo ss -plant | grep 3306; sudo iptables -S | sed -n '1,80p' || trueKey Takeaways & Next Steps
- Binary logging on the primary + a clean seed gets you a reliable replica.
- Lock down 3306 and scope the replication user to the replica’s IP.
- Monitor replica lag and IO/SQL threads; plan regular backups.
Related on Wiunix:
Linux Tutorials ·
MariaDB


