
Table of Contents
- Overview
- Prerequisites
- Quick Architecture
- Install / Setup
- Nginx Logging (for Fail2ban)
- Base Configuration (jails & filters)
- Reload/Enable & Health Checks
- Security / Hardening
- Performance & Optimization
- Backup & Restore
- Troubleshooting (Top issues)
- Key Takeaways & Next Steps
Overview
This tutorial builds a production-ready Fail2ban Nginx Protection Linux Servers. Fail2ban monitors Nginx/SSH logs and
automatically bans abusive IPs via your firewall. You’ll configure filters (regex), jails (rules + actions),
and OS-specific firewall actions (UFW, firewalld, or iptables). The goal is to stop brute-force/login abuse and noisy scans
without breaking legitimate users.
Prerequisites
- Linux with
sudoaccess and Nginx installed. - OpenSSH enabled (optional but common), Nginx access logs available.
- Firewall tool: UFW (Ubuntu/Debian) or firewalld (RHEL/Rocky/Fedora/openSUSE). If neither, iptables is available everywhere.
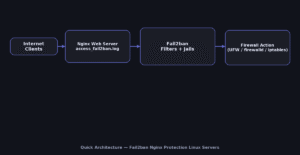
Quick Architecture
Install / Setup
Install Fail2ban from distro repositories and enable the service. Confirm version and default jail path.
Ubuntu/Debian
sudo apt update
sudo apt -y install fail2ban
fail2ban-client --version
systemctl status fail2ban --no-pager
RHEL/Rocky/CentOS Stream/Fedora
sudo dnf -y install fail2ban fail2ban-firewalld
sudo systemctl enable --now fail2ban
fail2ban-client --version
systemctl status fail2ban --no-pager
Arch/Manjaro
sudo pacman -Syu --noconfirm fail2ban
sudo systemctl enable --now fail2ban
fail2ban-client --version
openSUSE/SLE
sudo zypper refresh
sudo zypper install -y fail2ban
sudo systemctl enable --now fail2ban
fail2ban-client --version
Nginx Logging (for Fail2ban)
Fail2ban needs clear log lines that include HTTP status codes and request paths. Create a concise JSON-ish access log format
and reference it in your Nginx server blocks.
# /etc/nginx/nginx.conf (http block)
log_format fail2ban '$remote_addr - $remote_user [$time_local] '
                    '"$request" $status $body_bytes_sent "$http_referer" '
                    '"$http_user_agent"';

# in each server {} or globally
access_log /var/log/nginx/access_fail2ban.log fail2ban;
Reload Nginx to start writing to access_fail2ban.log.
sudo nginx -t && sudo systemctl reload nginxBase Configuration (jails & filters)
Create a jail.local with sane defaults and enable jails for SSH and Nginx (bot login abuse, 404 storms, and WP attacks if needed).
Filters live under /etc/fail2ban/filter.d/. We’ll add a simple Nginx filter that triggers on many 404s or auth failures.
# jail overrides
sudo tee /etc/fail2ban/jail.local >/dev/null <<'JAIL'
[DEFAULT]
bantime  = 1h
findtime = 15m
maxretry = 6
backend  = systemd
destemail = root@localhost
sender    = fail2ban@localhost
mta       = sendmail

# choose your firewall action set (uncomment one)
# action = ufw
# action = firewallcmd-ipset
# action = iptables-multiport

[sshd]
enabled = true
port    = ssh
logpath = %(sshd_log)s
backend = systemd

[nginx-req-limit]
enabled  = true
port     = http,https
filter   = nginx-req-limit
logpath  = /var/log/nginx/access_fail2ban.log
maxretry = 20
findtime = 10m
bantime  = 1h

[nginx-404-burst]
enabled  = true
port     = http,https
filter   = nginx-404-burst
logpath  = /var/log/nginx/access_fail2ban.log
maxretry = 30
findtime = 10m
bantime  = 1h
JAIL

# nginx-req-limit filter (lots of requests with 401/403/444/429)
sudo tee /etc/fail2ban/filter.d/nginx-req-limit.conf >/dev/null <<'FIL'
[Definition]
failregex = ^ - .* "(GET|POST|HEAD|PUT|DELETE|OPTIONS|PATCH) .*" (401|403|429|444) .*$
ignoreregex =
FIL

# nginx-404-burst filter (404 storms)
sudo tee /etc/fail2ban/filter.d/nginx-404-burst.conf >/dev/null <<'FIL'
[Definition]
failregex = ^ - .* "(GET|POST|HEAD|OPTIONS) .*" 404 .*$
ignoreregex =
FIL
Reload/Enable & Health Checks
Sequence to apply changes safely:
- Test Nginx and reload so logs are being written.
- Test filters with
fail2ban-regexagainst your log file. - Reload Fail2ban and verify jails are enabled + banning works.
Validate & Apply
# 1) Nginx
sudo nginx -t && sudo systemctl reload nginx

# 2) Check filters (sample)
sudo fail2ban-regex /var/log/nginx/access_fail2ban.log /etc/fail2ban/filter.d/nginx-404-burst.conf

# 3) Reload & status
sudo systemctl reload fail2ban || sudo systemctl restart fail2ban
sudo fail2ban-client status
sudo fail2ban-client status nginx-404-burst
sudo fail2ban-client status nginx-req-limit
Health & Logs
sudo journalctl -u fail2ban -f
sudo tail -f /var/log/fail2ban.log
Security / Hardening
Open only ports you need (80/443 and SSH). Use the firewall that matches your OS. Commands are split so Copy only grabs the relevant OS.
Ubuntu/Debian (UFW)
sudo ufw allow OpenSSH
sudo ufw allow 80/tcp
sudo ufw allow 443/tcp
sudo ufw reload
sudo ufw status
RHEL/Rocky/CentOS/Fedora/openSUSE/SLE (firewalld)
sudo firewall-cmd --permanent --add-service=http
sudo firewall-cmd --permanent --add-service=https
sudo firewall-cmd --permanent --add-service=ssh
sudo firewall-cmd --reload
sudo firewall-cmd --list-all
Generic (iptables) — if no UFW/firewalld
sudo iptables -A INPUT -p tcp --dport 22 -j ACCEPT
sudo iptables -A INPUT -p tcp --dport 80 -j ACCEPT
sudo iptables -A INPUT -p tcp --dport 443 -j ACCEPT
# save rules (varies per distro)
sudo sh -c 'iptables-save > /etc/iptables.rules'
Fail2ban action selection: in jail.local choose one action that matches your firewall:
action = ufw (UFW) / action = firewallcmd-ipset (firewalld) / action = iptables-multiport (iptables).
Performance & Optimization
Tips to reduce load and false positives:
- Increase
findtimeandmaxretryfor busy public sites to avoid banning legitimate bursts. - Whitelist internal networks via
ignoreipin[DEFAULT](e.g.,ignoreip = 127.0.0.1/8 10.0.0.0/8). - Use systemd backend (already set) for efficient log parsing.
- Trim Nginx logs with
logrotate(Fail2ban handles rotation).
Backup & Restore
Back up jail/filter configs and Nginx log format. Restore brings files back and restarts services.
Backup
sudo tar -C / -czf /root/fail2ban-nginx-backup-$(date +%F).tgz   etc/fail2ban etc/nginx --numeric-owner
sha256sum /root/fail2ban-nginx-backup-$(date +%F).tgz
Restore
BACKUP="/root/fail2ban-nginx-backup-YYYY-MM-DD.tgz"
sudo tar -C / -xzf "$BACKUP"
sudo nginx -t && sudo systemctl reload nginx
sudo systemctl restart fail2ban
sudo fail2ban-client status
Troubleshooting (Top issues)
No bans happen — Wrong log file path or filter miss. Re-check access_fail2ban.log and test with fail2ban-regex.
sudo fail2ban-regex /var/log/nginx/access_fail2ban.log /etc/fail2ban/filter.d/nginx-req-limit.conf -vLocked yourself out via SSH — Unban IP and add to ignoreip.
sudo fail2ban-client set sshd unbanip YOUR_IP
sudo sed -i 's/^#\?ignoreip.*/ignoreip = 127.0.0.1\/8 10.0.0.0\/8 YOUR_IP\//g' /etc/fail2ban/jail.local
sudo systemctl reload fail2ban
High CPU — Reduce active jails, raise findtime, or narrow filters. Confirm systemd backend is used.
Key Takeaways & Next Steps
- Fail2ban Nginx Protection Linux Servers blocks abusive clients quickly using your firewall.
- Keep filters specific, whitelist trusted IPs, and monitor logs.
- Next: add geo-blocking, WAF rules, or bot management in front of Nginx.


