Table of Contents
- Overview
- Prerequisites
- Quick Architecture
- Variables
- Step 1 – Install / Setup
- Step 2 – Base Configuration
- Step 3 – Enable Service
- Step 4 – Firewall & NAT
- Step 5 – Add-Ons / Plugins
- Step 6 – Client Files / Access
- Security
- Backup & Restore
- Troubleshooting
- Next Steps
Overview
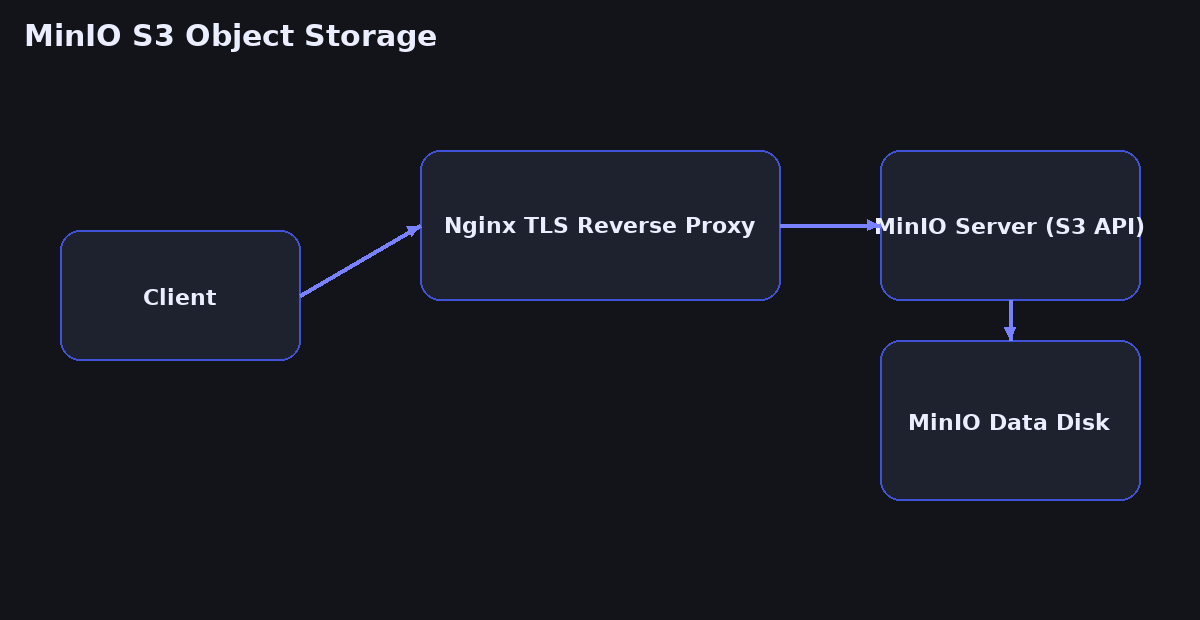
This guide sets up MinIO S3 Object Storage on a single Linux host with an optional Nginx TLS reverse proxy in front.
You will install MinIO, create an admin user, configure a systemd service, protect it with HTTPS, and verify access using the AWS S3 CLI. The steps are copy‑paste safe and separated by distro where needed.
Prerequisites
You need a fresh Linux server with root or sudo access, a public DNS record pointing at the server (for TLS), and outbound internet to fetch packages. If you already have Nginx and TLS on this machine, you can skip the corresponding substeps.
Quick Architecture
Variables
cat <<'EOF' | sudo tee /root/vars.sh
export APP_DOMAIN="s3.example.com"
export EMAIL="[email protected]"
export MINIO_DATA="/srv/minio"
export MINIO_USER="minioadmin"
export MINIO_PASS="ChangeMe_123!"
export NGINX_HTTP="80"
export NGINX_HTTPS="443"
export MINIO_PORT="9000"
export MINIO_CONSOLE="9001"
EOF
source /root/vars.sh
echo "$APP_DOMAIN $MINIO_PORT $MINIO_CONSOLE"  # Check
Before you copy: These variables are here so you can customize the guide to your environment.
Change them to any values you need (domain names, email, directories, ports, usernames). After saving the file and running
source /root/vars.sh, all commands in this guide will read from these variables automatically—so you only need to set them once.
APP_DOMAIN— the public hostname for Nginx/MinIO consoleEMAIL— mailbox used by Certbot notificationsMINIO_DATA— on‑disk storage pathMINIO_USER/MINIO_PASS— bootstrap admin credentialsMINIO_PORT/MINIO_CONSOLE— backend listen ports
Step 1 – Install / Setup
First you install required packages and create the MinIO data directory. The MinIO binary is distributed as a single static file and runs well on any modern distro.
On Debian / Ubuntu
sudo apt update
sudo apt -y install curl wget unzip ca-certificates nginx certbot python3-certbot-nginx
sudo install -d -m 750 -o root -g root "$MINIO_DATA"
curl -fsSL https://dl.min.io/server/minio/release/linux-amd64/minio -o /usr/local/bin/minio
sudo chmod +x /usr/local/bin/minio
minio --version  # Check
On RHEL / Rocky / Alma / CentOS Stream / Fedora
sudo dnf -y install curl wget unzip ca-certificates nginx certbot python3-certbot-nginx
sudo install -d -m 750 -o root -g root "$MINIO_DATA"
curl -fsSL https://dl.min.io/server/minio/release/linux-amd64/minio -o /usr/local/bin/minio
sudo chmod +x /usr/local/bin/minio
minio --version  # Check
On Arch / Manjaro
sudo pacman -Syu --noconfirm curl wget unzip ca-certificates nginx certbot certbot-nginx
sudo install -d -m 750 -o root -g root "$MINIO_DATA"
curl -fsSL https://dl.min.io/server/minio/release/linux-amd64/minio -o /usr/local/bin/minio
sudo chmod +x /usr/local/bin/minio
minio --version  # Check
On openSUSE / SLE
sudo zypper refresh
sudo zypper install -y curl wget unzip ca-certificates nginx certbot python3-certbot-nginx
sudo install -d -m 750 -o root -g root "$MINIO_DATA"
curl -fsSL https://dl.min.io/server/minio/release/linux-amd64/minio -o /usr/local/bin/minio
sudo chmod +x /usr/local/bin/minio
minio --version  # Check
Step 2 – Base Configuration
Create a dedicated user, a systemd service, and the environment file to pin credentials and ports. The service runs after network is ready and will restart automatically on failure.
# Create user and directories
sudo useradd -r -s /sbin/nologin -M minio || true
sudo chown -R minio:minio "$MINIO_DATA"
sudo chmod 750 "$MINIO_DATA"

# Environment file
sudo install -d -m 750 -o root -g root /etc/minio
cat <<'EOF' | sudo tee /etc/minio/minio.conf
MINIO_ROOT_USER="${MINIO_USER}"
MINIO_ROOT_PASSWORD="${MINIO_PASS}"
MINIO_VOLUMES="${MINIO_DATA}"
MINIO_OPTS="--address :${MINIO_PORT} --console-address :${MINIO_CONSOLE}"
EOF

# Systemd unit
cat <<'EOF' | sudo tee /etc/systemd/system/minio.service
[Unit]
Description=MinIO S3 Object Storage
Wants=network-online.target
After=network-online.target

[Service]
User=minio
Group=minio
EnvironmentFile=/etc/minio/minio.conf
ExecStart=/usr/local/bin/minio server $MINIO_VOLUMES $MINIO_OPTS
Restart=always
LimitNOFILE=65536

[Install]
WantedBy=multi-user.target
EOF

# Permissions
sudo chown root:root /etc/minio/minio.conf
sudo chmod 640 /etc/minio/minio.conf

# Nginx site
cat <<'EOF' | sudo tee /etc/nginx/sites-available/minio.conf
server {
  listen 80;
  server_name ${APP_DOMAIN};

  location / {
    proxy_set_header Host $host;
    proxy_set_header X-Real-IP $remote_addr;
    proxy_set_header X-Forwarded-For $proxy_add_x_forwarded_for;
    proxy_set_header X-Forwarded-Proto $scheme;
    proxy_pass http://127.0.0.1:${MINIO_PORT};
    client_max_body_size 0;
  }

  location /console/ {
    proxy_set_header Host $host;
    proxy_set_header X-Forwarded-Proto $scheme;
    proxy_pass http://127.0.0.1:${MINIO_CONSOLE};
  }
}
EOF
sudo ln -sf /etc/nginx/sites-available/minio.conf /etc/nginx/sites-enabled/minio.conf
sudo nginx -t  # Check
Step 3 – Enable Service
Now enable and start MinIO and reload Nginx. You should see MinIO listening on the backend ports.
sudo systemctl daemon-reload
sudo systemctl enable --now minio
sudo systemctl reload nginx || sudo systemctl restart nginx
ss -tulpen | grep -E ':(9000|9001)\b' || echo "not listening"  # Check
Step 4 – Firewall & NAT
Allow public HTTP and HTTPS, and keep backend ports private. These example commands add rules for common firewalls across distros.
On Debian / Ubuntu (ufw)
sudo ufw allow "$NGINX_HTTP"/tcp
sudo ufw allow "$NGINX_HTTPS"/tcp
sudo ufw reload
sudo ufw status verbose  # Check
On RHEL / Rocky / Alma / Fedora (firewalld)
sudo firewall-cmd --permanent --add-service=http
sudo firewall-cmd --permanent --add-service=https
sudo firewall-cmd --reload
sudo firewall-cmd --list-all  # Check
On Arch / Manjaro / openSUSE (nftables example)
sudo nft add rule inet filter input tcp dport { ${NGINX_HTTP}, ${NGINX_HTTPS} } counter accept
sudo nft list ruleset | sed -n '1,120p'  # Check
Step 5 – Add-Ons / Plugins
Issue a free TLS certificate and force HTTPS. Then create your first bucket and a programmatic user via the MinIO client.
# Certbot (automatic Nginx config)
sudo certbot --nginx -d "$APP_DOMAIN" -m "$EMAIL" --agree-tos --redirect -n
curl -I "https://$APP_DOMAIN" | head -n 5  # Check

# MinIO client (mc)
curl -fsSL https://dl.min.io/client/mc/release/linux-amd64/mc -o /usr/local/bin/mc
sudo chmod +x /usr/local/bin/mc
mc --version  # Check

# Add alias, make bucket, create user + policy
mc alias set myminio "https://$APP_DOMAIN" "$MINIO_USER" "$MINIO_PASS"
mc mb myminio/backup || true
cat <<'EOF' | tee /tmp/backup-policy.json
{"Version":"2012-10-17","Statement":[{"Effect":"Allow","Action":["s3:ListBucket"],"Resource":["arn:aws:s3:::backup"]},{"Effect":"Allow","Action":["s3:GetObject","s3:PutObject","s3:DeleteObject"],"Resource":["arn:aws:s3:::backup/*"]}]}
EOF
mc admin policy create myminio backuppolicy /tmp/backup-policy.json
mc admin policy attach myminio backuppolicy --user backupuser
mc admin user add myminio backupuser "StrongUserPass_123!"
mc ls myminio/  # Check
Step 6 – Client Files / Access
Test access with AWS CLI compatible tools. The example below creates a test file and uploads it to your bucket using the S3 API.
# Install awscli if missing
which aws || (sudo apt -y install awscli 2>/dev/null || sudo dnf -y install awscli 2>/dev/null || sudo pacman -S --noconfirm aws-cli 2>/dev/null || sudo zypper install -y aws-cli 2>/dev/null)

export AWS_ACCESS_KEY_ID="backupuser"
export AWS_SECRET_ACCESS_KEY="StrongUserPass_123!"
export AWS_DEFAULT_REGION="us-east-1"
echo "hello" > hello.txt
aws --endpoint-url "https://$APP_DOMAIN" s3 cp hello.txt s3://backup/  --no-verify-ssl
aws --endpoint-url "https://$APP_DOMAIN" s3 ls s3://backup/ --no-verify-ssl  # Check
Security
Keep backend ports bound to localhost, enforce HTTPS with a public certificate, and scope each user with the narrowest bucket policy necessary. Protect the environment file permissions and rotate admin secrets regularly.
Backup & Restore
Back up configuration files and bucket data. Store copies off‑host for disaster recovery.
Backup
sudo tar -czf /root/minio-config-backup.tgz /etc/minio/ /etc/nginx/sites-available/minio.conf
mc mirror myminio/backup file:///root/minio-bucket-backup
ls -lah /root/minio-config-backup.tgz  # Check
Restore
sudo tar -xzf /root/minio-config-backup.tgz -C /
mc mirror file:///root/minio-bucket-backup myminio/backup
mc ls myminio/backup  # Check
Troubleshooting
Service not running (Debian/Ubuntu unit name)
sudo systemctl status --no-pager minio
sudo journalctl -u minio --since "20 min ago" | tail -n 200
Service not running (RHEL/Rocky/Alma/Fedora/openSUSE unit name)
sudo systemctl status --no-pager minio
sudo journalctl -u minio --since "20 min ago" | tail -n 200
Port blocked
ss -tulpen | grep -E ':(80|443|9000|9001)\b' || echo "not listening"
sudo ufw status verbose 2>/dev/null || sudo firewall-cmd --list-all 2>/dev/null || sudo nft list ruleset 2>/dev/null | sed -n '1,120p'
Certbot/HTTPS not working
sudo nginx -t && sudo systemctl reload nginx
sudo certbot renew --dry-run
curl -Iv "https://$APP_DOMAIN" 2>&1 | sed -n '1,20p'
mc alias cannot connect
mc alias rm myminio || true
mc alias set myminio "https://$APP_DOMAIN" "$MINIO_USER" "$MINIO_PASS"
mc ls myminio/
Next Steps
Set up object lifecycle policies, add another disk and enable erasure coding, and integrate MinIO with your backup tools or Kubernetes workloads. Review the latest configuration options in the official docs.

