
Table of Contents
- Overview
- Prerequisites
- Quick Architecture
- Variables
- Step 1 – Install / Setup
- Step 2 – Base Configuration
- Step 3 – Enable Service
- Step 4 – Firewall & NAT
- Step 5 – MFA (Google Authenticator)
- Step 6 – Client Files (.ovpn)
- Security
- Backup & Restore
- Troubleshooting
- Next Steps
Overview
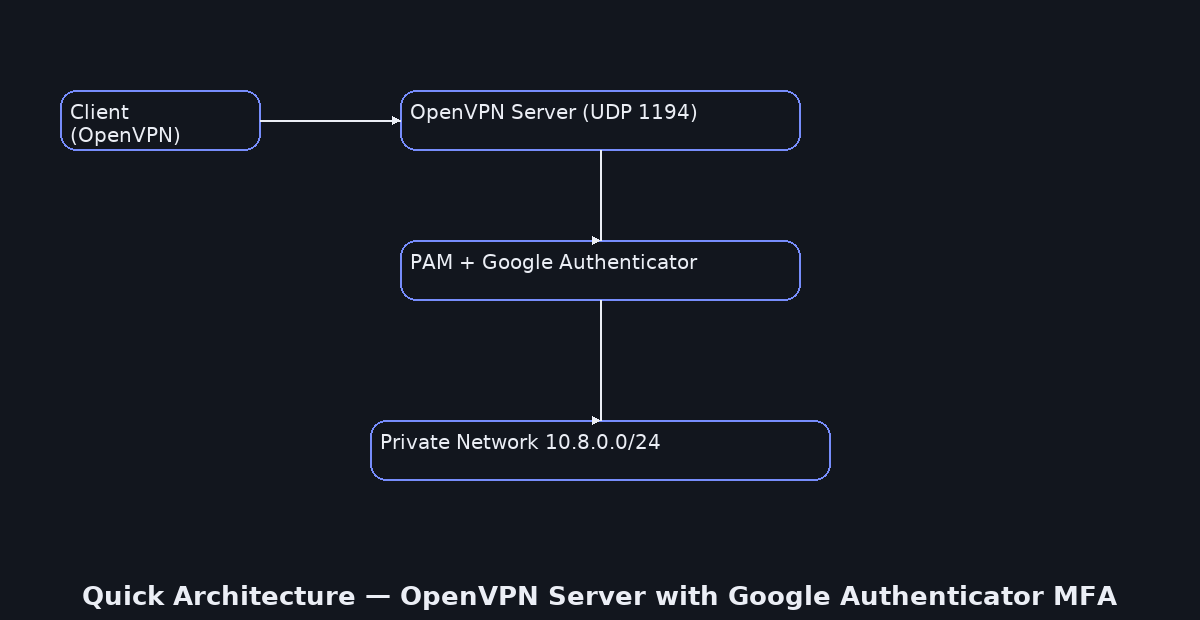
OpenVPN Server with Google Authenticator MFA hardens your VPN logins with time-based one-time passwords (TOTP).
You will install OpenVPN, create a small PKI (CA/server/client keys) with Easy-RSA, write a secure server config,
open the firewall with NAT, require a 6-digit code at login via PAM, and export ready-to-import client profiles.
Each step clearly tells you what to change and includes a short “Check:” so you never guess.
Reference: OpenVPN Community Docs.
Prerequisites
Have a Linux host with sudo (Debian/Ubuntu, RHEL/Rocky/Alma/CentOS/Fedora, Arch/Manjaro, openSUSE/SLE).
Make sure UDP 1194 is reachable from the Internet (or port-forwarded). A DNS name like vpn.example.com is optional but helpful.
Install a TOTP app on your phone (Google Authenticator/Authy/Aegis) for scanning the QR code later.
Quick Architecture
Variables
We keep all settings in one place so commands stay consistent. You can re-run this anytime to load the same values.
Before you copy: change OVPN_PUBLIC to your real DNS name or public IP. Change CLIENT_NAME to the first user’s client filename (e.g., alice).
cat <<'EOF' | sudo tee /root/ovpn-vars.sh
export OVPN_PROTO="udp"
export OVPN_PORT="1194"
export OVPN_NET="10.8.0.0"
export OVPN_MASK="255.255.255.0"
export OVPN_SUBNET="10.8.0.0/24"
export OVPN_PUBLIC="vpn.example.com"
export OVPN_DNS="1.1.1.1,1.0.0.1"
export OVPN_DIR="/etc/openvpn"
export EASYRSA_DIR="/etc/openvpn/easy-rsa"
export CLIENT_NAME="alice"
export PAM_PLUGIN="$(sudo find /usr/lib* -type f -name 'openvpn-plugin-auth-pam.so' | head -n1)"
EOF
source /root/ovpn-vars.sh
echo "Loaded → $OVPN_PUBLIC:$OVPN_PORT ($OVPN_PROTO) | subnet=$OVPN_SUBNET"
Step 1 – Install / Setup
This installs OpenVPN, Easy-RSA for the PKI, the Google Authenticator PAM module, and a firewall tool.
On Debian / Ubuntu
sudo apt update
sudo apt -y install openvpn easy-rsa libpam-google-authenticator qrencode ufw
openvpn --version | head -n 1  # Check
On RHEL / Rocky / Alma / CentOS Stream / Fedora
sudo dnf -y install openvpn easy-rsa google-authenticator qrencode firewalld
sudo systemctl enable --now firewalld
openvpn --version | head -n 1  # Check
On Arch / Manjaro
sudo pacman -Syu --noconfirm openvpn easy-rsa libpam-google-authenticator qrencode ufw
openvpn --version | head -n 1  # Check
On openSUSE / SLE
sudo zypper refresh
sudo zypper install -y openvpn easy-rsa google-authenticator qrencode firewalld
sudo systemctl enable --now firewalld
openvpn --version | head -n 1  # Check
Step 2 – Base Configuration
Write a full OpenVPN server configuration that uses routed mode, pushes DNS and default route to clients,
and enables PAM so a 6-digit TOTP code is required at connection time.
Before you copy: these lines use the variables you set (OVPN_PORT, OVPN_DNS, …). If you change the vars later, re-run source /root/ovpn-vars.sh and re-create the file.
cat <<'EOF' | sudo tee /etc/openvpn/server.conf
port ${OVPN_PORT}
proto ${OVPN_PROTO}
dev tun
user nobody
group nogroup
persist-key
persist-tun

server ${OVPN_NET} ${OVPN_MASK}
topology subnet
ifconfig-pool-persist ipp.txt

push "redirect-gateway def1"
push "dhcp-option DNS ${OVPN_DNS}"

ca ca.crt
cert server.crt
key server.key
dh dh.pem

tls-auth ta.key 0
remote-cert-tls client
cipher AES-256-GCM
auth SHA256
tls-version-min 1.2

# PAM (Google Authenticator)
plugin ${PAM_PLUGIN} "openvpn"
client-cert-not-required
username-as-common-name
verify-client-cert none

keepalive 10 120
status openvpn-status.log
verb 3
explicit-exit-notify 1
EOF
# Check: key flags are present
grep -E '^(port|proto|cipher|auth|tls-version-min|plugin|redirect-gateway)' -n /etc/openvpn/server.conf
Step 3 – Enable Service
Enable and start the OpenVPN service. Unit names differ by distro.
On Debian / Ubuntu
sudo systemctl enable --now openvpn@server
sudo systemctl --no-pager status openvpn@server  # Check: active (running)
On RHEL / Rocky / Alma / Fedora / Arch / openSUSE
sudo systemctl enable --now openvpn-server@server
sudo systemctl --no-pager status openvpn-server@server  # Check: active (running)
Step 4 – Firewall & NAT
Turn on IPv4 forwarding, allow the VPN port, and add NAT so clients reach the Internet via this host.
All Linux
echo 'net.ipv4.ip_forward=1' | sudo tee /etc/sysctl.d/99-ovpn.conf
sudo sysctl --system | grep ip_forward  # Check
On UFW (Debian/Ubuntu/Arch-with-UFW)
sudo ufw allow OpenSSH
sudo ufw allow ${OVPN_PORT}/${OVPN_PROTO}
OVPN_IF=$(ip route get 1.1.1.1 | awk '{{print $5; exit}}')
sudo sed -i 's/^#*DEFAULT_FORWARD_POLICY.*/DEFAULT_FORWARD_POLICY="ACCEPT"/' /etc/default/ufw
sudo bash -c 'cat >> /etc/ufw/before.rules <
On firewalld (RHEL/Fedora/openSUSE/SLE)
sudo firewall-cmd --permanent --add-service=openvpn || sudo firewall-cmd --permanent --add-port=${OVPN_PORT}/${OVPN_PROTO}
sudo firewall-cmd --permanent --add-masquerade
sudo firewall-cmd --reload
sudo firewall-cmd --list-all
ss -ulpen | grep :${OVPN_PORT}  # Check
On nftables (manual alternative)
sudo bash -c 'cat > /etc/nftables.conf <Step 5 – MFA (Google Authenticator)
This step creates a per-user TOTP secret and hooks OpenVPN into PAM so connecting users must type a 6-digit code from their phone.
The PAM line we use here makes OpenVPN ask for a username and one password prompt. In this guide the “password” is the 6-digit TOTP, not the Linux password.
How TOTP works: the server and your phone share a small secret (seed). Every 30 seconds both sides compute a new code using the same clock.
If clocks drift, codes won’t match. That’s why time sync matters.
Before you copy: replace vpnuser with the real Linux username you want to use for VPN logins. Repeat the user enroll step for each person.
# 1) Create a dedicated Linux account for VPN logins
sudo adduser --disabled-password --gecos "" vpnuser || true

# 2) Generate a TOTP secret for this user (noninteractive, rate-limit flags enabled)
sudo -u vpnuser -H bash -lc 'google-authenticator -t -d -f -r 3 -R 30 -w 3 -Q UTF8 -l "VPN (vpnuser)"'

# 3) Bind OpenVPN to PAM Google Authenticator (OTP-only login in this guide)
echo "auth required pam_google_authenticator.so" | sudo tee /etc/pam.d/openvpn

# 4) OPTIONAL — Show the raw secret and a terminal QR to scan in your app
SECRET=$(sudo awk 'NR==1{print $1}' /home/vpnuser/.google_authenticator)
URI="otpauth://totp/VPN%20(vpnuser)?secret=${SECRET}&issuer=OpenVPN"
echo "otpauth URI: $URI"
echo "$URI" | qrencode -t ANSIUTF8

# Check: the secret file exists for this user
sudo ls -l /home/vpnuser/.google_authenticator
Notes: With the PAM line above, OpenVPN accepts a username (e.g., vpnuser) and a single password prompt where you enter only the 6-digit OTP. If you need both Linux password and OTP, you would chain pam_unix in /etc/pam.d/openvpn and follow its prompts (not covered here).
Step 6 – Client Files (.ovpn)
Client profiles contain connection settings and CA/TA data. You’ll import them into desktop/mobile OpenVPN apps.
Before you copy: change CLIENT_NAME inside the filename to your client’s name (e.g., bob or iphone).
Change OVPN_PUBLIC to your public DNS or IP if you haven’t already. If your port/proto differ, they come from the vars.
cat <<'EOF' | sudo tee /root/${CLIENT_NAME}.ovpn
client
dev tun
proto ${OVPN_PROTO}
remote ${OVPN_PUBLIC} ${OVPN_PORT}
resolv-retry infinite
nobind
persist-key
persist-tun
remote-cert-tls server
cipher AES-256-GCM
auth SHA256
key-direction 1
verb 3
auth-user-pass


$(cat ${OVPN_DIR}/ca.crt)


$(cat ${OVPN_DIR}/ta.key)

EOF
# Check: file exists and has content
ls -lah /root/${CLIENT_NAME}.ovpn
How to use: import the .ovpn into your OpenVPN client. When prompted, enter the VPN username (e.g., vpnuser) and the current 6-digit OTP as the password.
Security
Keep strong TLS settings in /etc/openvpn/server.conf (cipher AES-256-GCM, auth SHA256, tls-version-min 1.2).
Require OTP via PAM as above. Protect keys so only root can read them. Limit firewall to only the OpenVPN port and SSH.
sudo chown -R root:root /etc/openvpn
sudo chmod -R go-rwx /etc/openvpn
find /etc/openvpn -type f -perm -004 -print || true  # Check: no world-readable secrets
Backup & Restore
Back up configs and keys so you can restore quickly after a mistake or migration.
Backup — create a dated archive and a checksum.
sudo tar -C / -czf /root/openvpn-backup-$(date +%F).tgz \
  etc/openvpn etc/ufw etc/firewalld /etc/nftables.conf /root/ovpn-vars.sh --numeric-owner
sha256sum /root/openvpn-backup-$(date +%F).tgz  # Check
Restore — stop the service, extract, fix perms, and start again.
BK="/root/openvpn-backup-YYYY-MM-DD.tgz"
sudo systemctl stop openvpn@server 2>/dev/null || sudo systemctl stop openvpn-server@server 2>/dev/null || true
sudo tar -C / -xzf "$BK"
sudo chown -R root:root /etc/openvpn && sudo chmod -R go-rwx /etc/openvpn
sudo systemctl start openvpn@server 2>/dev/null || sudo systemctl start openvpn-server@server
sudo systemctl --no-pager status openvpn@server 2>/dev/null || sudo systemctl --no-pager status openvpn-server@server
Troubleshooting
Run only the block that matches your symptom. Each issue is isolated with its own commands.
Service not running (Debian/Ubuntu unit name)
If the service fails to start, print status and recent logs to see typos in server.conf.
sudo systemctl status --no-pager openvpn@server
sudo journalctl -u openvpn@server --since "30 min ago" | tail -n 200
Service not running (RHEL/Rocky/Alma/Fedora/Arch/openSUSE unit name)
Same idea but with the other unit name.
sudo systemctl status --no-pager openvpn-server@server
sudo journalctl -u openvpn-server@server --since "30 min ago" | tail -n 200
Port 1194 is closed / blocked
Confirm the process listens on UDP 1194, then inspect firewall rules for your platform.
ss -ulpen | grep -E ':(1194)\b' || echo "OpenVPN not listening"
sudo ufw status verbose 2>/dev/null || sudo firewall-cmd --list-all 2>/dev/null || sudo nft list ruleset 2>/dev/null | sed -n '1,150p'
MFA fails (OTP wrong, secret missing, or time drift)
Make sure the PAM file exists, the user’s secret file is present, and the server clock is synced.
sudo ls -l /etc/pam.d/openvpn
sudo ls -l /home/vpnuser/.google_authenticator
timedatectl  # Check NTP sync
Client connects but no Internet through VPN
Usually NAT or IP forwarding is missing. Verify sysctl and NAT rules are loaded.
grep -R '^net.ipv4.ip_forward' /etc/sysctl.d /etc/sysctl.conf
sudo nft list ruleset 2>/dev/null | grep -A4 -E 'postrouting|masquerade' || sudo ufw status verbose || sudo firewall-cmd --list-all
Next Steps
- Enroll more users by repeating Step 5 for each Linux account (each user gets their own TOTP secret).
- If you need both Linux passwords and OTP, chain
pam_unixwithpam_google_authenticatorin/etc/pam.d/openvpn.


